RV AC Unit Installation Guide: Easy Steps
gorvlifestyle.com and its partners may earn a commission if you purchase a product through one of our links
If your RV air conditioner is not cooling properly, it may be time to replace the unit. Replacing an RV AC unit can be a cost-effective DIY project. In order to install a new RV AC unit, you will need to purchase two main parts: the rooftop unit and the ceiling assembly. The ceiling assembly can be either ducted or non-ducted, depending on your RV’s ventilation system. It is important to consult with a professional to determine the best replacement package for your RV, considering factors such as cooling capacity and energy efficiency. The installation process itself is relatively simple and can be done by someone with minimal technical skills. It involves removing the old AC unit, preparing the roof, placing the new unit, and connecting the ducts and electrical wiring. It is important to follow all safety precautions and consult the owner’s manual for specific instructions for your RV AC unit.
Key Takeaways:
- Replacing an RV AC unit can be a cost-effective DIY project.
- Consult with a professional to determine the best replacement package for your RV.
- The installation process is relatively simple and can be done by someone with minimal technical skills.
- Follow all safety precautions and consult the owner’s manual for specific instructions.
- Consider factors such as cooling capacity and energy efficiency when choosing a replacement unit.
Do I Need to do a Complete RV A/C Installation?
Not all issues with an RV air conditioner require a complete replacement. Minor problems such as a faulty fan blade or motor can be fixed by replacing only the necessary parts. However, if the AC unit is old and experiencing multiple issues, it is more cost-effective to replace the entire unit. When doing a complete RV AC installation, you will need to purchase the rooftop unit and the ceiling assembly. The ceiling assembly can be ducted or non-ducted, depending on your RV’s ventilation system. It is important to consider the cost of replacement parts versus the investment in a new unit. Consulting with a professional can help you make an informed decision.
Benefits of a Complete RV A/C Installation
Opting for a complete RV A/C installation offers several advantages:
- You can ensure that all components of the AC system are brand new, reducing the risk of future breakdowns and extending the lifespan of your unit.
- A new AC unit may come with advanced features such as improved energy efficiency, better cooling capacity, and quieter operation.
- Replacing both the rooftop unit and the ceiling assembly allows for a seamless integration of the new system, maximizing its performance.
Consider the Parts Needed for RV A/C Replacement
When planning a complete RV A/C installation, make sure to acquire all the necessary parts:
| Parts | Description |
|---|---|
| Rooftop Unit | The main component responsible for cooling air |
| Ceiling Assembly | The unit inside your RV that distributes cooled air and may be ducted or non-ducted |
By replacing both the rooftop unit and the ceiling assembly, you ensure that your RV’s air conditioning system is in top condition and provides optimal comfort during your travels.
What are the Steps to Complete a Camper Air Conditioner Installation?
Installing a camper air conditioner involves several steps that can be easily accomplished with minimal technical skills. Proper installation ensures efficient cooling and comfort during your RV travels. Follow these simple steps to successfully install your new RV AC unit:
- Step 1: Removing the Old RV AC Unit
- Step 2: Preparing the Roof
- Step 3: Placing the New RV AC Unit
- Step 4: Installing the Ceiling Assembly
- Step 5: Testing the New Unit
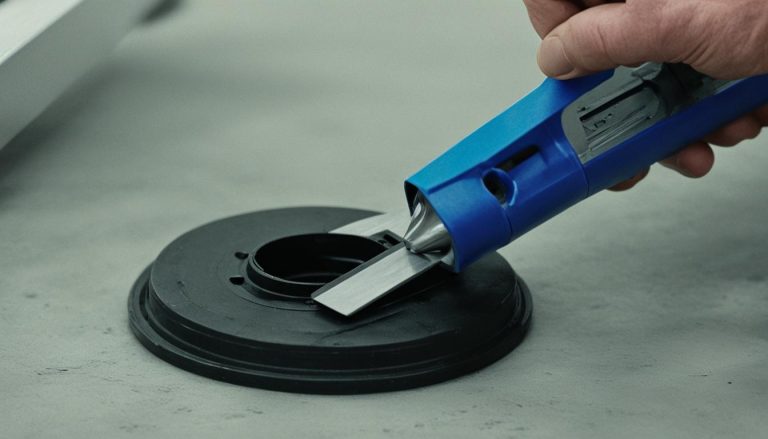
Begin by taking off the air conditioner shroud to access the unit. Next, remove the ceiling assembly inside your coach by unscrewing it from the ceiling. Disconnect the electrical wiring by carefully disconnecting the wires from their respective terminals. Lastly, separate the foam gasket from the roofing surface by gently peeling it off.
Before installing the new AC unit, it’s important to prepare the roof properly. If needed, place wood sheets or planks to provide a sturdy base for the unit. Remove any old sealants or excess roof coating to ensure a clean installation. Use rubbing alcohol or an appropriate cleaner to clean the area around the roof opening.
Align the foam gasket of the new AC unit with the opening on the roof. Carefully lift and place the unit in position, ensuring it is centered and level. Double-check that the foam gasket is properly aligned and fully covering the opening to prevent any leaks.
Inside your coach, install the ceiling assembly by aligning it with the opening in the ceiling. Connect the ducts and electrical wiring according to the manufacturer’s instructions. Make sure all connections are secure and properly insulated to maintain efficient airflow.
Once the installation is complete, it’s time to test your new RV AC unit. Connect your RV to a power source and turn on the unit. Check for any unusual noises, proper airflow, and cooling performance. Make any necessary adjustments or troubleshoot as needed.
Following these steps ensures a smooth and successful installation of your new camper air conditioner. Enjoy the comfort of a well-functioning AC unit during your RV adventures!
Tips for a Successful RV AC Unit Installation
To ensure a successful installation of your RV AC unit, follow these helpful tips and best practices:
Gather the Necessary Tools and Materials
Before you begin the installation process, make sure you have all the tools and materials you’ll need. This includes:
- A putty knife to remove any existing sealants
- A wire cutter to trim any excess wiring
- A socket or wrench set to secure the AC unit
- Rubbing alcohol for cleaning surfaces
- A screwdriver set for various tasks
- Masking tape to mark positions and prevent scratches
- A gasket for a secure seal
- A heat gun to soften adhesive materials
- A utility knife for precise cuts
- Old towels or blankets to protect the RV’s interior
- A soft cloth for cleaning
Follow Safety Precautions
Prioritize safety throughout the installation process. Disconnect the power to avoid electrical hazards, and create a safe work environment. Use caution when working at heights and always follow guidelines for ladder safety.
Take Your Time and Double-Check
RV AC unit installation requires precision and attention to detail. Take your time to ensure everything is aligned correctly and connected securely. Double-check your work at each step to avoid any issues or potential damage.
Consult the Owner’s Manual or Seek Professional Assistance
If you encounter any difficulties or uncertainties during the installation process, refer to the owner’s manual for specific instructions. You can also consider seeking professional assistance to ensure a smooth and successful installation.

With these tips and best practices in mind, you’re ready to tackle the installation of your RV AC unit with confidence.
Considerations for RV AC Unit Replacement
When it comes to replacing your RV AC unit, there are several important considerations to keep in mind. Making the right choices during the replacement process can ensure the comfort and efficiency of your RV’s cooling system.
- Choosing the Right Replacement Unit: One of the first things to consider is the type of unit that best suits your needs. Look for a replacement unit with the appropriate cooling capacity for your RV, ensuring that it can effectively cool the entire interior. Consider factors such as the size of your RV and your typical usage conditions.
- Energy Efficiency: Another crucial factor to consider is the energy efficiency of the replacement unit. Opting for an energy-efficient RV AC unit can help reduce your overall energy consumption and lower your utility bills. Look for units with high SEER ratings, indicating better energy performance.
- Heat Pump-Assisted Rooftop Units: Depending on your RV’s heating needs, you may want to consider a heat pump-assisted rooftop unit. These units not only provide cooling during hot weather but also offer heating capabilities in colder climates. They can be a convenient all-in-one solution for year-round comfort in your RV.
- RV AC Heat Strip: If you often travel during shoulder seasons or need extra heating capabilities, installing an RV AC heat strip can be beneficial. This electric element is integrated into the AC unit and provides electric heat, allowing you to take off the chill while connected to shore power or running a generator.
By carefully considering these factors before purchasing a replacement RV AC unit, you can ensure that you choose a unit that meets your cooling and heating needs while maximizing energy efficiency.

Maintenance Tips for RV Air Conditioners
To keep your RV air conditioner in good working condition, regular maintenance is important. One key maintenance task is cleaning the RV AC filter to ensure proper airflow and cooling performance. The filter can be found in the ceiling assembly and should be cleaned or replaced as needed. A dirty or clogged filter can restrict airflow and strain the AC unit, leading to reduced efficiency and potential damage.
Another essential aspect of RV AC unit maintenance is protecting your RV from hot weather. Extreme heat can negatively impact your AC unit’s performance and put unnecessary strain on it. Whenever possible, park your RV in shaded areas to minimize direct exposure to sunlight. Additionally, using window coverings such as blinds or curtains can help reduce heat buildup inside the vehicle. By reducing the workload on your AC unit, you can keep your RV interior cooler and maximize the unit’s effectiveness.
In addition to cleaning the filter and protecting your RV from hot weather, it is crucial to monitor voltage levels at RV parks. Low or fluctuating voltage levels can affect the performance and lifespan of your AC unit. Investing in a voltage regulator can help maintain optimal power supply to your AC unit, ensuring it operates efficiently and effectively.
By following these maintenance tips, you can keep your RV air conditioner running smoothly, extend its lifespan, and improve your overall camping experience. Regularly cleaning the AC filter, protecting your RV from hot weather, and monitoring voltage levels are simple yet effective measures to ensure your RV AC unit remains in top condition for years to come.
FAQ
How do I install an RV AC unit?
To install an RV AC unit, you will need to purchase the rooftop unit and the ceiling assembly. The installation process involves removing the old unit, preparing the roof, placing the new unit, and connecting the ducts and electrical wiring. It is important to consult the owner’s manual for specific instructions.
Do I need to do a complete RV A/C installation?
Not all issues require a complete replacement. Minor problems can be fixed by replacing necessary parts, but multiple issues in an old unit make it more cost-effective to replace the entire unit. Consult a professional to make an informed decision.
What are the steps to complete a camper air conditioner installation?
The steps include removing the old AC unit, preparing the roof, placing the new unit, and connecting the ducts and electrical wiring. It is important to follow safety precautions and consult the owner’s manual for specific instructions.
What are some tips for a successful RV AC unit installation?
Ensure you have all the necessary tools and materials, follow safety precautions, take your time during the installation process, and consult the owner’s manual or consider hiring a professional for assistance.
What considerations should I keep in mind when replacing an RV AC unit?
Consider the required cooling capacity and energy efficiency of the unit. You may also want to consider a heat pump-assisted rooftop unit or an RV AC heat strip for additional heating capabilities.
What are some maintenance tips for RV air conditioners?
Regularly clean or replace the RV AC filter, protect your RV from hot weather by parking in shaded areas and using window coverings, and monitor voltage levels at RV parks to ensure optimal performance.