Winterize Your RV: Simple Steps for Cold Weather
gorvlifestyle.com and its partners may earn a commission if you purchase a product through one of our links
As the temperatures drop, it’s important to protect your RV from the cold. Winterizing your RV involves replacing the water in your lines with antifreeze to prevent frozen pipes and potential damage. While you can have your RV professionally winterized, you can save money by doing it yourself. Follow these simple steps to winterize your RV and keep it in top condition throughout the winter months.
Key Takeaways:
- Winterizing your RV’s plumbing system is crucial to prevent frozen pipes and costly repairs.
- By replacing the water in your RV’s lines with antifreeze, you ensure that any remaining water is protected from freezing temperatures.
- Gather all the necessary materials, such as marine/RV antifreeze, a water-heater bypass kit, and hand tools, before starting the winterizing process.
- Follow a step-by-step guide to properly winterize your RV, which includes draining tanks, bypassing the water heater, and adding antifreeze.
- Additional tips for winterizing your RV include using dehumidifiers, breathable covers, and rodent deterrents.
Why Winterize Your RV’s Plumbing System
Winterizing your RV’s plumbing system is crucial to protect it from the harsh conditions of winter. Freezing temperatures can wreak havoc on your RV’s water system, leading to frozen pipes, leaks, and costly repairs. By taking the necessary steps to winterize your RV, you can ensure that it remains in optimal condition and ready for use when the temperatures warm up again.
When water in your RV’s plumbing lines freezes, it expands, putting immense pressure on the pipes. This expansion can cause pipes to crack, rupture, or even burst, resulting in extensive damage to your RV’s water system. By properly winterizing your RV, you replace any remaining water in the lines with antifreeze, which remains in a liquid state even at frigid temperatures. This antifreeze acts as a protective barrier, preventing the expansion of frozen water and safeguarding your RV’s plumbing system.
Not only does winterizing your RV protect it from the immediate risks of frozen pipes, but it also helps to avoid long-term damage. Unaddressed water freezes can result in leaks and compromised plumbing fixtures, necessitating expensive repairs. By taking the time to winterize your RV’s plumbing system, you can prevent these issues and enjoy peace of mind throughout the winter months.
The importance of protecting your RV during winter
Winterizing your RV is not just about safeguarding the water system; it’s about protecting your entire investment. RVs are prone to damage caused by extreme cold weather, including cracked exteriors, damaged seals, and electrical system issues. By implementing proper winterization techniques, such as protecting the water system, ensuring adequate insulation, and covering the RV, you can extend the lifespan of your vehicle and minimize the need for costly repairs.
Winter weather can be harsh, especially on vehicles that are not designed for extreme temperatures. Taking the time to winterize your RV shows a proactive approach to maintenance and care, not only ensuring its longevity but also preserving its resale value. By protecting your RV during the winter, you can have peace of mind knowing that when spring arrives, your RV will be ready for new adventures.
| Benefits of Winterizing Your RV’s Plumbing System |
|---|
| Prevent frozen pipes |
| Minimize the risk of leaks and burst pipes |
| Avoid costly repairs |
| Protect the entire RV investment |
| Extend vehicle lifespan |
| Maintain resale value |
Now that you understand the importance of winterizing your RV’s plumbing system, it’s time to gather the necessary materials and follow the step-by-step guide to protect your RV during the winter months.
Gather Your Materials
Before you begin the winterizing process, gather all the necessary materials. Having these items on hand will make the winterizing process easier and more efficient. Here’s a checklist of what you’ll need:
| Materials | Quantity |
|---|---|
| Marine/RV Antifreeze | A few gallons |
| Water-heater bypass kit | If not already installed |
| Cleaning wand | 1 |
| Water pump converter kit or tubing | 1 |
| Hand tools | To remove drain plugs |
| Bucket | 1 |
Once you have gathered all your materials, you’ll be ready to start winterizing your RV and protecting it from the cold weather ahead.
Why Are These Materials Important?
The marine/RV antifreeze is crucial for preventing your RV’s water system from freezing and causing damage. The water-heater bypass kit allows you to bypass the water heater during the winterizing process, saving antifreeze and making it easier to dewinterize in the spring. The cleaning wand helps flush out any remaining water from the lines, ensuring they are fully winterized. The water pump converter kit or tubing enables you to pump antifreeze into the system. The hand tools are necessary for removing drain plugs, and the bucket provides a convenient way to collect and dispose of water during the winterizing process.
Step-by-Step Guide to Winterizing Your RV
Follow these simple steps to effectively winterize your RV and prepare the plumbing system for the cold winter months:
- Remove or bypass water filters: Before you begin the winterizing process, it is important to remove or bypass water filters. This step ensures that the antifreeze does not damage the filters and gives you the opportunity to check if they need replacement.
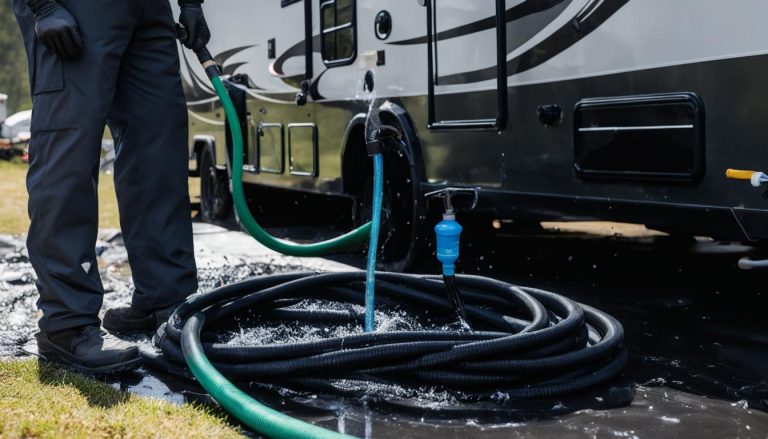
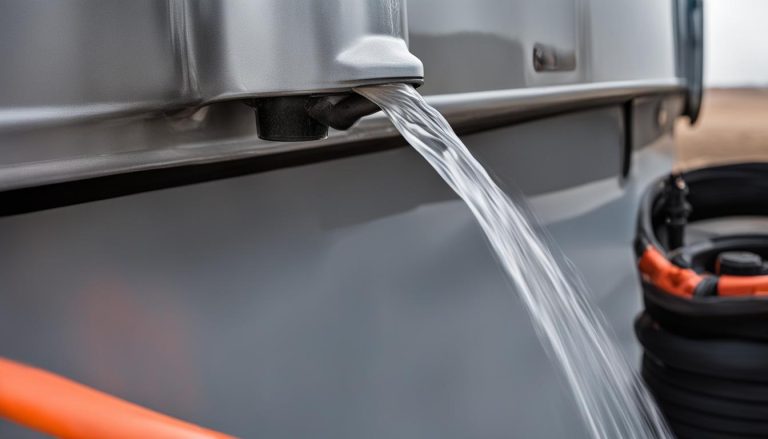
- Drain the tanks: Start by draining the freshwater holding tank, then locate and drain the black and gray water tanks. Properly draining these tanks prevents water from freezing and potential bacterial growth.
- Drain the water heater and lines: Turn off the water heater, shut off the water going into it, and fully drain the water heater tank. Open all faucets and drain the water lines to remove any remaining water.
- Bypass the water heater: If your RV does not already have a bypass system, consider installing one or have it done by a professional. Bypassing the water heater prevents wasting antifreeze and makes the dewinterizing process easier.
- Add antifreeze: Use a water pump conversion kit or connect tubing to the pump to pump antifreeze into the system. Start with the closest faucet and gradually work your way to the farther faucets, ensuring antifreeze flows through all the lines.
- The batteries: If your RV will be sitting in the cold for an extended period, remove the batteries and store them in a warm, dry place. Consider using a battery maintainer to keep them charged.
By following these steps, you can successfully winterize your RV and ensure that the plumbing system is protected from the freezing temperatures.

“Properly winterizing your RV is essential to protect your investment from costly damage. By following this step-by-step guide, you can rest assured that your plumbing system is prepared for the winter season.” – RV enthusiast
Additional Tips for Winterizing Your RV
In addition to the main steps, here are some extra tips for winterizing your RV:
- Consider using a dehumidifier or leaving a few windows cracked open to prevent moisture buildup.
- Use breathable covers to protect your RV from the elements.
- Remove alkaline batteries from devices to prevent corrosion.
- Use rodent deterrents like Bounce dryer sheets or Irish Spring soap to keep mice away.
- Check your owner’s manual for specific instructions on winterizing your ice maker and washing machine.
Moisture Control
During the winter months, moisture buildup can lead to mold and mildew growth inside your RV. To prevent this, consider using a dehumidifier or leaving a few windows cracked open to allow for proper air circulation. This will help maintain a dry and mold-free environment.
Protective Covers
To shield your RV from the harsh winter elements, invest in a high-quality breathable cover. These covers are designed to protect your RV from snow, rain, and UV rays while still allowing air to circulate, preventing moisture buildup and potential mold issues.
Battery Maintenance
To prevent corrosion and extend the lifespan of your RV’s batteries, remove any alkaline batteries from devices such as remote controls and clocks. Store them separately in a dry place to ensure they remain in optimal condition for use when you’re ready to hit the road again.
Rodent Deterrence
Mice can seek warmth and shelter in your RV during the winter months, causing damage to wires, upholstery, and insulation. To keep them away, place Bounce dryer sheets or Irish Spring soap around your RV’s interior and exterior compartments. The strong scents are known to deter rodents and keep them from making a cozy home in your RV.
Appliance-Specific Instructions
Your RV’s owner’s manual will provide specific instructions on how to winterize appliances such as ice makers and washing machines. These instructions may include draining and cleaning procedures, as well as any necessary maintenance steps. Be sure to follow these instructions carefully to properly winterize these appliances and avoid potential damage.

| Tips | Benefits |
|---|---|
| Use a dehumidifier or leave windows cracked open | Prevents moisture buildup and mold growth |
| Invest in breathable covers | Protects RV from snow, rain, and UV rays |
| Remove alkaline batteries | Prevents corrosion and extends battery lifespan |
| Use rodent deterrents | Keeps mice away and prevents damage |
| Follow appliance-specific instructions | Ensures proper winterization of ice makers and washing machines |
Final Steps and Tips for Winterizing Your RV
Once you have completed the winterizing process, it’s important to take a few final steps to ensure your RV remains in top condition throughout the winter season. Follow these tips to keep your RV protected and ready for your next adventure:
1. Clean the interior and exterior of your RV: Before storing your RV, give it a thorough cleaning. Remove any dirt or debris from the interior and wash the exterior to prevent any damage from lingering grime.
2. Ensure all windows, vents, and doors are closed properly: Check that all openings are securely closed to prevent any drafts or water leaks during the winter months.
3. Make sure propane tanks are closed: Shut off the propane supply and ensure the tanks are tightly closed. This will help avoid any potential hazards and conserve propane for future use.
4. Fill tires with air to the proper level: Properly inflated tires can prevent flat spots and damage that can occur when your RV is stationary for an extended period. Make sure the tires are filled to the manufacturer’s recommended psi.
5. Leave the fridge, cabinets, and doors ajar to promote air circulation: By slightly opening the fridge, cabinets, and doors, you allow air to circulate and prevent moisture from building up inside your RV.
6. Follow specific instructions for winterizing the fridge, if applicable: If your RV’s fridge requires additional winterization steps, consult the owner’s manual for specific instructions to protect the appliance from freezing temperatures.
7. Take precautions to protect against mice and rodents: Rodents may seek shelter in your RV during the winter. Use rodent deterrents like Bounce dryer sheets or Irish Spring soap to keep them away from your RV.
8. Store the RV in a safe, dry location: Find a secure storage facility or a covered area where your RV can be protected from harsh weather conditions. This will help extend the life of your RV and keep it safe during the winter months.
By following these steps and tips, you can successfully winterize your RV and have peace of mind knowing it will be in great shape when spring arrives. Take the time to properly prepare your RV for the winter, and you’ll be ready for your next adventure in no time!
FAQ
What does it mean to winterize an RV?
Winterizing an RV involves preparing it for cold weather by replacing the water in the plumbing system with antifreeze to prevent frozen pipes and potential damage.
Why is it important to winterize an RV’s plumbing system?
Winterizing the plumbing system is crucial to prevent frozen pipes and costly repairs. When water freezes in the pipes, it expands and can cause leaks or burst pipes.
What materials do I need to winterize my RV?
To winterize your RV, you will need marine/RV antifreeze, a water-heater bypass kit, a cleaning wand, a water pump converter kit or tubing, hand tools, and a bucket.
What are the steps to winterize an RV?
The steps to winterize an RV include removing or bypassing water filters, draining the tanks, draining the water heater and lines, bypassing the water heater, and adding antifreeze to the system.
Are there any additional tips for winterizing an RV?
Yes, some additional tips include using a dehumidifier or leaving windows cracked open, using breathable covers, removing alkaline batteries, and using rodent deterrents.
What are the final steps and tips for winterizing an RV?
The final steps and tips for winterizing an RV include cleaning the interior and exterior, closing windows/vents/doors properly, ensuring propane tanks are closed, filling tires with air, promoting air circulation, and storing the RV in a safe, dry location.