Easy Guide: How to Flush RV Water Heater
gorvlifestyle.com and its partners may earn a commission if you purchase a product through one of our links
Flushing your RV water heater is an essential part of regular maintenance to ensure optimal performance and longevity. By following these step-by-step instructions, you can easily flush your RV water heater and keep your adventures trouble-free.
Key Takeaways:
- Regularly flushing your RV water heater helps remove sediment, scale, and debris that can affect its performance and lifespan.
- Flushing your RV water heater improves efficiency, increases heating capacity, and prevents damage to the water heater.
- Gather the necessary tools and materials before starting the flushing process.
- Follow a step-by-step guide to ensure thorough cleaning of your RV water heater.
- Adhere to best practices for flushing and maintaining your RV water heater to ensure effective results.
Why Flushing Your RV Water Heater is Important
Regularly flushing your RV water heater is crucial to maintain its optimal performance and prevent potential issues. Flushing helps eliminate sediment, scale, and other debris that accumulate over time, ensuring that your water heater functions efficiently. By taking care of this essential maintenance task, you can enjoy several benefits and extend the lifespan of your RV water heater.
The Importance of Flushing RV Water Heater
Flushing your RV water heater is more than just routine maintenance; it is an integral part of ensuring the longevity and efficiency of your system. Here are some key reasons why flushing your RV water heater is important:
- Prevents Build-Up: Sediment and scale can accumulate in your RV water heater over time. Flushing helps remove these deposits, preventing blockages and ensuring smooth water flow.
- Enhances Performance: Build-up in your water heater can impact its performance, leading to reduced efficiency and heating capacity. Flushing regularly improves performance, allowing your water heater to operate at its best.
- Protects Against Damage: Accumulated debris can cause damage to the internal components of your water heater. Flushing helps prevent corrosion, leaks, and other issues that can result in costly repairs or replacements.
- Improves Water Quality: Flushing removes impurities, improving the quality of the water that flows through your RV water heater. This ensures a consistent supply of clean and hot water for your travels.
Benefits of Flushing RV Water Heater
Flushing your RV water heater offers numerous advantages that go beyond maintenance. Here are some key benefits:
“Flushing your RV water heater not only maintains its performance but also saves you time and money by preventing potential damages and repairs.”
| Advantages of Flushing RV Water Heater |
|---|
| 1. Improved Efficiency |
| 2. Extended Lifespan |
| 3. Consistent Hot Water Supply |
| 4. Prevention of Costly Repairs |
Take advantage of these benefits by incorporating regular flushing into your RV water heater maintenance routine. By investing a little time and effort, you can ensure that your water heater operates at its best and provides you with trouble-free hot water throughout your adventures.
Tools and Materials Needed for Flushing RV Water Heater
Before you begin, gather the necessary tools and materials for flushing your RV water heater. Ensuring you have the right equipment and supplies will make the process easier and more efficient.
Tools for Flushing RV Water Heater
- Socket wrench or adjustable wrench
Materials for Flushing RV Water Heater
- Water heater tank rinser or tank cleaning wand
- Garden hose with good water pressure
You may also want to have a bucket or drain pan to collect the draining water during the process.
Equipment for Flushing RV Water Heater
In order to successfully flush your RV water heater, it is essential to have the right equipment. A socket wrench or adjustable wrench will be needed to remove the drain plug, allowing the water to drain from the tank. Additionally, a water heater tank rinser or tank cleaning wand is necessary to thoroughly clean the interior of the tank. These specialized tools are designed specifically for RV water heaters and ensure a proper flush.
Supplies for Flushing RV Water Heater
In addition to the necessary tools and equipment, you will need specific supplies for flushing your RV water heater. A garden hose with good water pressure is required to fill the tank and flush out any debris or sediment. It is vital to have a hose that can deliver adequate water flow to effectively clean the tank. Additionally, having a bucket or drain pan on hand will allow you to collect and dispose of the draining water properly.
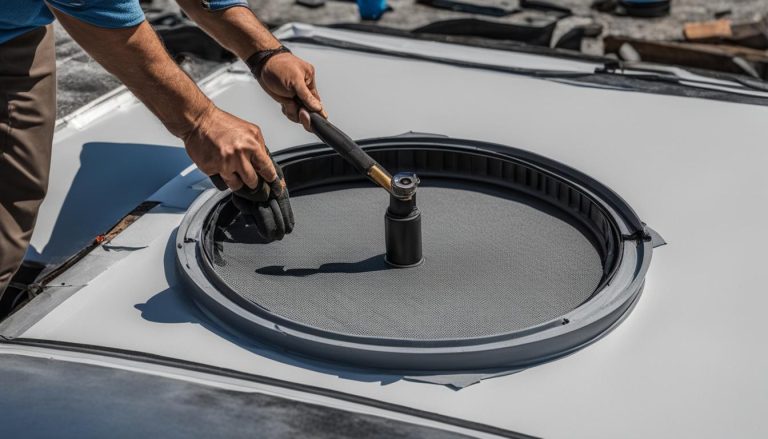
Step-by-Step Guide to Flush RV Water Heater
Follow these step-by-step instructions to flush your RV water heater:
- Turn off the water heater and shut off the water pump or water supply.
- Open the pressure relief valve to release any built-up pressure.
- Unscrew the drain plug or anode rod to drain the water from the tank.
- Attach the water heater tank rinser or tank cleaning wand to a garden hose.
- Insert the rinser or wand into the drain opening and turn on the water.
- Move the rinser or wand around the tank to ensure thorough cleaning.
- Continue flushing until the water runs clear and free from debris.
- Replace the drain plug or anode rod and tighten securely.
- Turn on the water pump or water supply and refill the tank.
- Test the water heater to ensure proper functioning.
| Step | Description |
|---|---|
| 1 | Turn off the water heater and shut off the water pump or water supply. |
| 2 | Open the pressure relief valve to release any built-up pressure. |
| 3 | Unscrew the drain plug or anode rod to drain the water from the tank. |
| 4 | Attach the water heater tank rinser or tank cleaning wand to a garden hose. |
| 5 | Insert the rinser or wand into the drain opening and turn on the water. |
| 6 | Move the rinser or wand around the tank to ensure thorough cleaning. |
| 7 | Continue flushing until the water runs clear and free from debris. |
| 8 | Replace the drain plug or anode rod and tighten securely. |
| 9 | Turn on the water pump or water supply and refill the tank. |
| 10 | Test the water heater to ensure proper functioning. |
Incorporating these maintenance steps into your routine will help keep your RV water heater in top shape and ensure a worry-free camping experience.

Best Practices for Flushing RV Water Heater
Flushing your RV water heater is a crucial maintenance task that ensures optimal performance and extends its lifespan. By following these best practices, you can effectively flush your RV water heater and avoid any potential issues.
- Flush the water heater at least once a year or as recommended by the manufacturer. Regular flushing prevents the accumulation of sediment and scale, which can lead to reduced efficiency and damage.
- Use a tank cleaning wand or rinser specifically designed for RV water heaters. These tools help dislodge stubborn deposits and ensure a thorough cleaning.
- Follow the manufacturer’s instructions for your specific water heater model. Each RV water heater may have unique flushing requirements, so it’s essential to adhere to the provided guidelines.
- Check the condition of the anode rod and replace it if necessary. The anode rod protects the water heater from corrosion, and a worn-out rod can compromise its effectiveness.
- Avoid flushing the water heater if it still has hot water to prevent scalding. Make sure to turn off the water heater and allow it to cool down before initiating the flushing process.
- Use a high-pressure setting on the rinser or wand to dislodge stubborn deposits. This ensures thorough cleaning and improves the overall performance of the water heater.
- Regularly monitor the performance of your water heater to detect any issues early on. Pay attention to any changes in water temperature or unusual noises, as these may indicate a need for further maintenance.
By implementing these best practices, you can maintain a clean and efficient RV water heater, ensuring a reliable supply of hot water during your travels.

Important Note:
Flushing your RV water heater regularly not only improves its performance but also prevents potential damage and costly repairs. Neglecting this essential maintenance task can lead to diminished heating capacity and even the need for a complete replacement. Don’t underestimate the importance of flushing your RV water heater!
RV Water Heater Maintenance Tips
In addition to regular flushing, proper maintenance is key to extending the lifespan and ensuring reliable performance of your RV water heater. Follow these tips to keep your water heater in top shape:
- Check the anode rod regularly: The anode rod helps prevent corrosion inside the tank. Inspect it annually and replace it when it becomes depleted to protect your water heater from damage and extend its lifespan.
- Inspect the pressure relief valve: A faulty pressure relief valve can lead to leaks or potential safety hazards. Regularly inspect and test the valve to ensure it is functioning properly.
- Keep the water heater compartment clean: Remove any debris, dust, or cobwebs from the compartment surrounding the water heater. This ensures proper ventilation and prevents potential issues.
- Test the temperature and pressure relief valve: Periodically check the temperature and pressure relief valve to ensure it is opening and closing correctly. This valve is a crucial safety feature of the water heater.
- Monitor the water temperature: Adjust the temperature setting of your water heater to prevent overheating. High water temperatures can not only waste energy but also increase the risk of scalding.
- Drain the water heater when storing your RV: If you plan to store your RV for an extended period, it’s important to drain the water heater. This prevents water from freezing inside the tank and causing damage.
- Consider installing a water softener or filter: Hard water can lead to mineral buildup inside the tank, affecting the efficiency and performance of your water heater. Install a water softener or filter to prevent this issue.
By following these maintenance tips, you can maximize the lifespan of your RV water heater and ensure that it operates at its best. Remember to incorporate these practices into your regular RV maintenance routine for optimal results.
| Maintenance Tips | Description |
|---|---|
| Check the anode rod regularly | Inspect and replace the anode rod to prevent corrosion and protect the water heater. |
| Inspect the pressure relief valve | Regularly check and test the pressure relief valve to ensure it is functioning correctly. |
| Keep the water heater compartment clean | Remove debris and maintain cleanliness in the water heater compartment for optimal performance. |
| Test the temperature and pressure relief valve | Verify that the temperature and pressure relief valve is operating properly. |
| Monitor the water temperature | Adjust the water heater temperature setting to prevent overheating. |
| Drain the water heater when storing your RV | Prevent freezing and potential damage by draining the water heater before long-term storage. |
| Consider installing a water softener or filter | Install a water softener or filter to prevent mineral buildup in the water heater tank. |
Benefits of Proper RV Water Heater Maintenance
Regular maintenance of your RV water heater is crucial for keeping it in optimal condition and enjoying a trouble-free experience on your adventures. By following a routine maintenance schedule and flushing your RV water heater as needed, you can reap several benefits that enhance its longevity and performance.
One of the key advantages of maintaining your RV water heater is the extended lifespan it provides. Proper care and regular flushing help prevent sediment, scale, and other debris from accumulating in the tank, which can lead to damage and decreased efficiency. By keeping your water heater clean and well-maintained, you can ensure it lasts for years to come.
Additionally, proper maintenance results in improved energy efficiency and reduced operating costs. Flushing your water heater removes build-up that can hinder its ability to heat water efficiently. With a clean tank, your water heater can work more effectively, reducing energy consumption and ultimately saving you money on fuel or electricity.
Furthermore, regular maintenance guarantees a consistent and reliable supply of hot water during your trips. By flushing the tank and removing any blockages, you can ensure a steady flow of hot water whenever you need it, enhancing your comfort and convenience. Plus, maintaining your water heater minimizes the risk of unexpected breakdowns or the need for costly repairs or replacements.
Lastly, proper RV water heater maintenance prioritizes safety. Flushing the tank helps reduce the risk of scalding by keeping the water temperature regulated and preventing the build-up of harmful chemicals or contaminants. By taking care of your water heater, you can have peace of mind knowing that it is functioning optimally and ensuring the safety of you and your loved ones.
FAQ
Why is flushing your RV water heater important?
Flushing your RV water heater helps remove sediment, scale, and debris that can accumulate over time, improving performance and increasing its lifespan.
What tools and materials do I need for flushing my RV water heater?
You will need a socket wrench or adjustable wrench, a water heater tank rinser or tank cleaning wand, and a garden hose with good water pressure. You may also want to have a bucket or drain pan to collect draining water.
How do I flush my RV water heater?
To flush your RV water heater, turn off the water heater and water supply, open the pressure relief valve, unscrew the drain plug or anode rod, attach a water heater tank rinser or wand to a garden hose, insert it into the drain opening, turn on the water, and move the rinser or wand around the tank until the water runs clear.
What are the best practices for flushing an RV water heater?
Some best practices for flushing an RV water heater include flushing it at least once a year, using a tank cleaning wand or rinser designed for RV water heaters, following the manufacturer’s instructions, and regularly monitoring the water heater’s performance.
What are some maintenance tips for my RV water heater?
Some maintenance tips for your RV water heater include regularly checking the condition of the anode rod and replacing it if necessary, inspecting the pressure relief valve, keeping the water heater compartment clean, and testing the temperature and pressure relief valve periodically.
What are the benefits of proper RV water heater maintenance?
Proper maintenance of your RV water heater extends its lifespan, improves energy efficiency, ensures a consistent hot water supply, prevents costly repairs, enhances safety, and provides peace of mind knowing that it is functioning optimally.