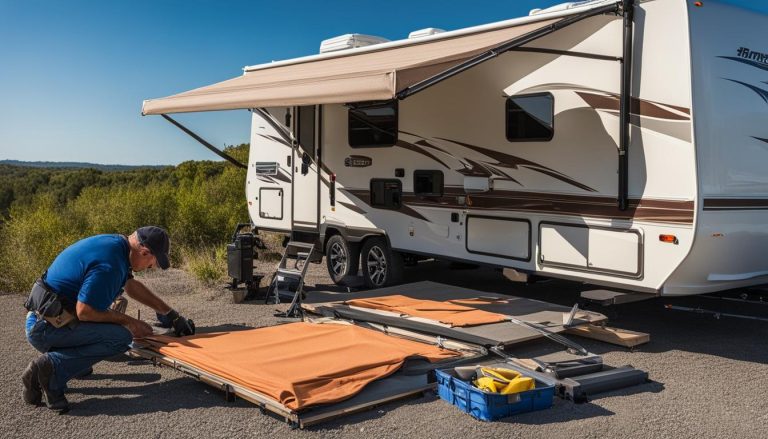
RV Awning Replacement Guide – Step by Step
gorvlifestyle.com and its partners may earn a commission if you purchase a product through one of our links
Replacing the fabric of an RV awning is a doable DIY project that can save you time and money. By following this step-by-step guide, you can easily upgrade or repair your RV awning. The guide is based on a tutorial by RVing couple Kory and Denise from the YouTube channel “Does Size Matter,” who demonstrate the process using their Dometic A&E awning. However, the steps can generally be applied to similar RV awnings.
Key Takeaways:
- Replacing the fabric of an RV awning is a DIY project that can save you money and enhance your RV lifestyle.
- Make sure to have the necessary tools, such as safety glasses, screwdriver, measuring tape, wire cutters, and a drill.
- Removing the old awning involves locking the springs, disconnecting the awning tube from the awning arms, and sliding out the old fabric.
- Installing the new fabric requires sliding it into the track, securing it with the awning arms, and winding the spring back up.
- Test and secure the new awning fabric to ensure proper functionality and enjoy your outdoor adventures!
Necessary Tools for RV Awning Fabric Replacement
To replace the fabric of your RV awning, you will need a set of tools. The necessary tools may vary depending on the specific awning, but Kory and Denise used the following tools for their Dometic A&E awning replacement:
- Safety glasses
- Rv caulk
- Vice grips
- Screwdriver (Phillips or flat head)
- Sharpie
- Wire cutters
- A nail or pin
- Measuring tape
- Razor cutter
- Drill
These tools will help you complete the fabric replacement process smoothly and safely.
Pulling Out the Old Awning
The first step in replacing your RV awning fabric is to pull out the old awning. Follow these simple steps to remove the existing awning:
- Start by flipping the awning latch into the “out” position and extend the awning.
- Pull out the stabilizing arms and lock them into place to secure the awning in its fully extended position.
- To lock the springs in place:
- On a Dometic A&E awning, place the awning lever in the “roll down” position.
- Insert a nail or pin into the rear end cap of the awning tube.
- Use a vice grip to hold the front shaft of the awning tube while disconnecting it from the awning arm.
By following these steps, you will be able to safely and efficiently remove the old awning in preparation for the fabric replacement.

Unwinding and Removing the Spring
After disconnecting the awning tube from the awning arms, it’s time to unwind the spring. This step is essential for the RV awning repair process. You’ll need to count the number of revolutions while unwinding the spring since you’ll have to wind the new awning fabric the same number of times. It’s crucial to maintain a firm grip on the vice grip to prevent the spring from unwinding violently.
Once the spring is completely unwound, you can remove the awning tube end cap and easily slide off the old awning fabric from the roller. This allows you to move forward with the next steps of the fabric replacement process.

Remember to take your time and follow the instructions carefully when unwinding the spring. It’s also a good idea to wear safety glasses to protect your eyes from any potential hazards.
Removing the Old Awning Fabric
With the awning tube and spring unwound, you can proceed to remove the old awning fabric. This step is crucial in preparing your RV for the installation of the new fabric. Here’s a breakdown of the process:
- Remove rain gutters or screws securing the fabric: Before you can slide out the old fabric, check if there are any rain gutters or screws holding it in place. Remove them carefully to free the fabric.
- Slide out the awning fabric: With the fabric now free, you can slide it out of the awning. This step might require some strength, as the fabric could be tightly secured. Take your time and ensure a smooth removal process.
- Clean the awning track and surrounding area: While removing the old fabric, take the opportunity to scrub out any dirt and grime near the awning track. This will help ensure a clean surface for the installation of the new fabric.
- Protect the new fabric from sharp edges: Cover any sharp edges or corners with tape to prevent them from damaging the new fabric during installation. This simple step can help prolong the lifespan of your new awning fabric.
Remember, removing the old awning fabric is a crucial step in the overall process of replacing your RV awning. Taking the time to do it properly will set the stage for a successful and hassle-free installation of the new fabric.
Installing the New Awning Fabric
After removing the old awning fabric, it’s time to install the new fabric. Follow these steps to ensure a successful RV awning installation:
- Start by sliding the new fabric into the track on top of the RV. Take your time to make sure the fabric is centered and aligned properly.
- Once the fabric is in place, re-install the awning arms and rain spout to secure the fabric.
- To prevent any leaks, seal the bolt holes for the awning bracket using RV caulk. This will provide added protection against water damage.
- Next, re-insert the spring by winding it back up the same number of times it was unwound during the removal process. This step is crucial for maintaining proper tension.
- Install the awning tube cap to cover the end of the tube, ensuring it is securely fastened.
- Finally, re-attach the awning arms to the awning roller tube, taking care not to disturb the spring. This will complete the installation process.
By following these steps, you can successfully install the new awning fabric and ensure that your RV awning is ready for use. Take your time during the installation process to ensure everything is done correctly.
Remember, if you are uncertain about any step or encounter difficulties during the installation, consult the specific instructions for your RV awning model or seek professional assistance.
Testing and Securing the New Awning Fabric
With the new awning fabric installed, it’s time to test it out and secure it in place.
- Remove the pin securing the rear spring to allow the awning to move freely. This step ensures that the awning can be rolled up and down without any obstructions.
- Roll the new awning fabric up and down a few times to check its functionality. Pay attention to any issues such as fabric bunching or uneven rolling.
- If the awning rolls up correctly, it’s time to insert set screws to secure the fabric in place. These screws will prevent the fabric from sliding or shifting during use.
Take this opportunity to thoroughly test the functionality of the awning. Make sure it rolls up smoothly, without any resistance or jams. Additionally, adjust the tension of the springs if necessary to ensure proper operation.
“Testing the awning and securing the fabric are crucial steps in the RV awning repair process. By ensuring the fabric is secure and the awning operates smoothly, you can enjoy worry-free outdoor living.”
Once you are satisfied with the testing and securing, you can move on to enjoying your newly repaired RV awning. Now you can confidently continue your outdoor adventures, knowing that your awning is in top shape.
Common Issues and Troubleshooting
| Issue | Troubleshooting |
|---|---|
| The awning fabric rolls up unevenly. | Check the tension of the springs and adjust as needed. Ensure that the fabric is centered when rolling up. |
| The awning fabric doesn’t roll up smoothly. | Inspect the fabric for any obstructions or snags. Lubricate the awning mechanism if necessary. |
| The fabric slides or shifts during use. | Tighten the set screws to secure the fabric in place. Make sure they are properly aligned with the fabric and not overtightened. |
| The awning doesn’t fully extend or retract. | Check for any blockages in the awning arms or track. Lubricate the moving parts and ensure proper alignment. |
By troubleshooting common issues, you can address any potential problems with your awning before they escalate. Remember, it’s always better to be proactive and fix minor issues early on to prevent further damage.
Conclusion and Additional Resources
Congratulations on completing the RV awning fabric replacement! By following the step-by-step guide and utilizing the necessary tools, you have successfully upgraded or repaired your RV awning. Not only have you saved money, but you have also enhanced your RV lifestyle.
Remember to consult the specific instructions for your awning model to ensure a seamless installation. Additionally, consider exploring additional resources to gather extra tips and details for your specific RV awning. One valuable resource is the tutorial video by Kory and Denise, available on their YouTube channel “Does Size Matter.”
Now that you have a newly replaced RV awning, it’s time to enjoy your outdoor adventures to the fullest. Embrace the additional shade and protection that your awning provides, and make lasting memories with your loved ones. Whether you’re camping, tailgating, or simply relaxing in nature, your RV awning will be a valuable asset for years to come.
Thank you for choosing this comprehensive guide for your RV awning replacement needs. We hope it has been informative and helpful throughout your DIY journey. Happy travels, and may your RV awning continue to serve you well!
FAQ
What tools do I need for replacing the fabric of my RV awning?
To replace the fabric of your RV awning, you will need the following tools: safety glasses, RV caulk, vice grips, screwdriver (Phillips or flat head), sharpie, wire cutters, a nail or pin, measuring tape, razor cutter, and a drill.
How do I pull out the old awning?
To pull out the old awning, start by flipping the awning latch into the “out” position, extend the awning, pull out the stabilizing arms, lock them into place, lock the springs, and proceed to remove the awning tube from the awning arms.
How do I unwind and remove the spring of the RV awning?
To unwind and remove the spring of the RV awning, count the number of revolutions while unwinding the spring, have a firm grip on the vice grip, remove the awning tube end cap, and slide the old awning fabric off the roller.
How do I remove the old awning fabric?
To remove the old awning fabric, you may need to remove any rain gutters or screws that secure the fabric in place. Once it’s free, slide it out of the awning while ensuring there are no sharp edges that could damage the new fabric.
How do I install the new awning fabric?
To install the new awning fabric, slide it into the track on top of the RV, center it, secure it by re-installing the awning arms and rain spout, and seal the bolt holes with RV caulk. Then, re-insert the spring, install the awning tube cap, and wind the spring the same number of times it was unwound.
How do I test and secure the new awning fabric?
To test and secure the new awning fabric, remove the pin securing the rear spring, roll the new awning fabric up and down, and if it rolls up correctly, insert set screws to keep the fabric in place.
Are there any additional resources for RV awning replacement?
Yes, you can find extra tips and details on RV awning replacement by watching the tutorial video by Kory and Denise from the YouTube channel “Does Size Matter.”